Archive for category Technical skills

Create a DVD Tutorial. Part 4

This post begins from from here: Create a DVD tutorial in case you are lost.

In this post series I talk about mastering a DVD from various DVD sources.

This post talks about taking the ripped DVD files (VOB files, created in the previous step) and converting them to .AVI format for use in the video editor in the next step

Step 3. ConvertVobToAvi (Convert the DVD files to more usable file formats)

This software (http://www.convertvobtoavi.com/) does exactly as the name says. The file format created using DVD Decrypter in the previous step created a .VOB file. This needs to be converted to .AVI file to be read in the editing application (next step)

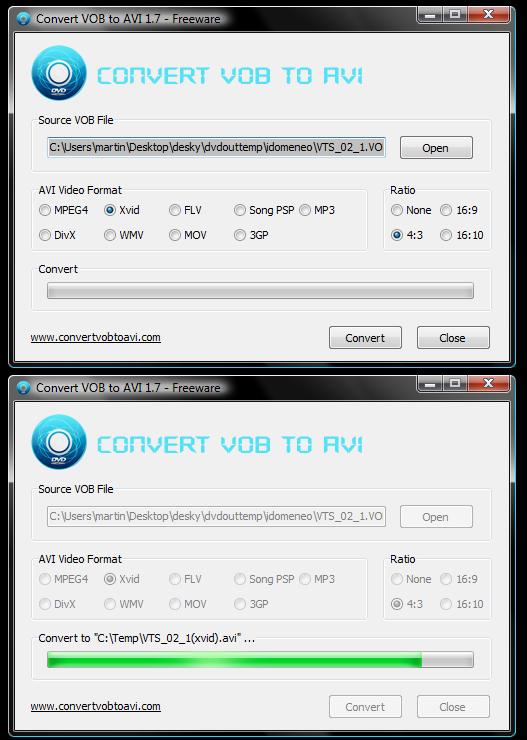
After downloading, installing and loading the application, click open in the “Source VOB File” section (at the top of the window) and locate the VOB file that you created earlier for your DVD track.

Next select the output format and ratio size. Select XVID and 4:3 for just now. Notice you could also make different formats (even for PSP) and widescreen (16:9) if you feel like experimenting.

Click Convert. You will then be asked for the destination folder. I put this in C:\TEMP but you can put it on your desktop folder so you dont lose it. After selecting the folder the conversion will begin.

You can see the progression of the file as shown on the bottom screen shot, but I found that it took 3-4 minutes longer after the progression bar had reached the top before the SAVING SUCCESS message popped up.

I did this with all 3 VOB files (the DVD tracks I ripped earlier) to produce 3 AVI files.

My source video was 4:3 and I used XVID because I know its an open-source codec. I would recommend using these as defaults but if your source DVD is widescreen or a different ratio, then you can change to suit.
Share Button

Tags: , , , ,

1 Comment

Create a DVD Tutorial. Part 3

This post begins from from here: Create a DVD tutorial in case you are lost.

In this post series I talk about mastering a DVD from various DVD sources.

This post talks about using DVD Decryper to rip a DVD’s tracks to the computer.

Step 2 Using DVD Decrypter to rip the tracks.

If you haven’t done so already, download DVD Decrypter (http://www.dvddecrypter.org.uk/) Even though it says that development has stopped, the download file is still available.

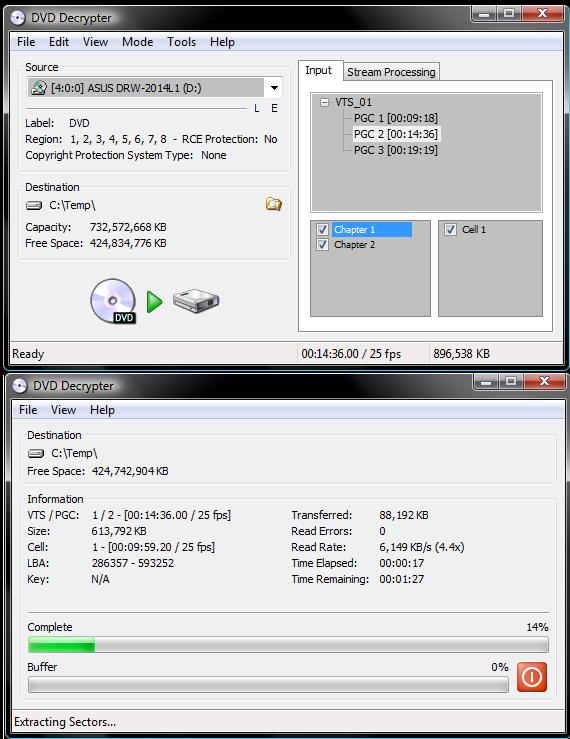
To get the selected DVD tracks on to the hard drive, I used this software on each DVD. When I loaded in a DVD, it listed the tracks at the right of the screen with tick boxes to select which tracks and chapters you wanted to copy. A track contains many chapters and its impossible to see how long each chapter is using this software. It is possible to rip by chapter, but because I didnt know which ones to tick, I just selected them all from one track.

The next step is to choose the destination folder. This is shown on the left part of the window (see the picture) and there is a small folder icon to select a folder to save to. In this case I just put it to C:\Temp folder.

The next step is to click the big DVD/Hard drive icon at the bottom left. This starts the program with the settings given. The bottom snapshot shows what the window now looks like. It rips the selected DVD tracks to file. This process takes a few minutes, and at the end you will have files in the C:\Temp folder. These are the ripped dvd videos.

There are lots of settings to be played about with in this program but I found just doing the simple actions of choosing what to rip, where to put it and click to start was all the options I needed for this purpose. If you feel adventureous you could have a look in all the menus and see what tweaks can be done.

Share Button

Tags: , , ,

No Comments