Archive for category Technical skills

Create a DVD Tutorial. Part 6

This post begins from from here: Create a DVD tutorial in case you are lost.

In this post series I talk about mastering a DVD from various DVD sources.

In this post I take you through using DVD Styler, an application to build a DVD image file with menus and videos. This software creates a DVD file (.iso file) which can then be burned to disk, or viewed on the computer.

DVDStyler (http://www.dvdstyler.de/) is a DVD authoring application. Now I had my 3 videos in AVI format, cropped and faded (from the previous step) the next step is to compile the DVD image using these videos. DVD Styler is a great piece of software which creates DVDs which are usable in standard DVD players.

Using this software I ordered the videos how I wanted, and added a customised DVD menu system to select the Videos on the DVD, as well as an ‘info’ page.

There is lots more to this software than what is in this tutorial, but there should be enough here to get a feel for the program and do the basics. I’ve split this part of the tutorial into 2 posts because there was so many pictures.

Steps to author the DVD image:

  1. Start Application and Create a new project with Wizard
  2. Add videos
  3. Customise menu settings and background
  4. Edit, Move and Delete Objects in the menu pages
  5. Change Text
  6. Add Text Object
  7. Add Image Object
  8. Add Information menu page
  9. ‘Burn’ the DVD image

Step 1: Start Application and Create a new project with Wizard

Downloading, installing and running the application was an easy process. When you run, you will be presented with this screen.
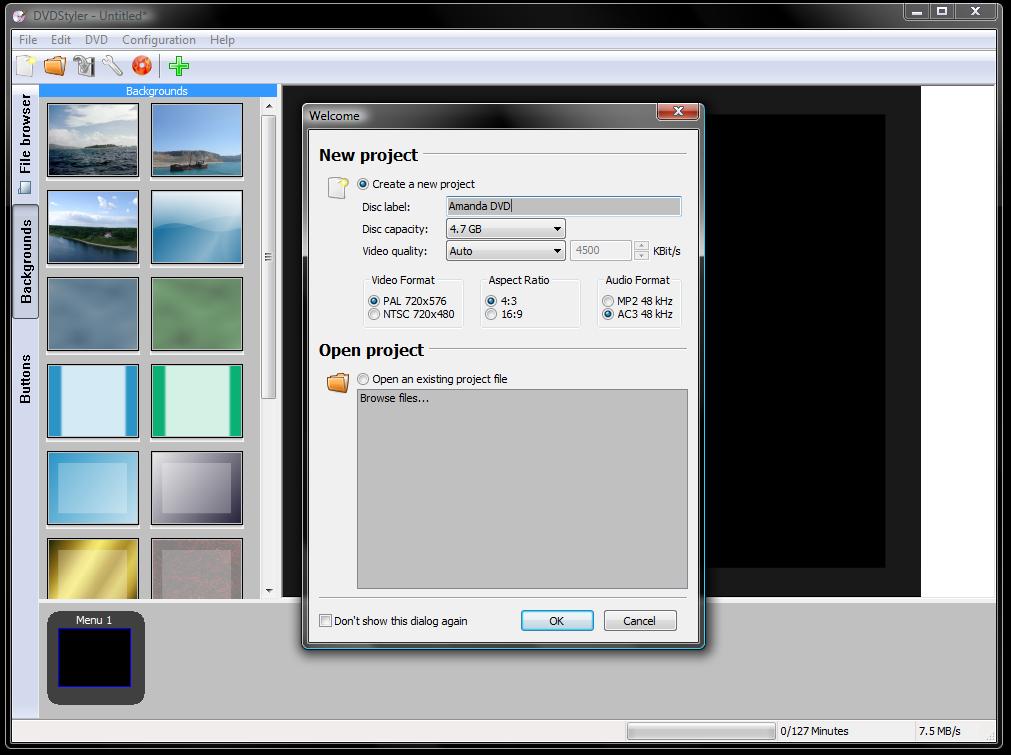
DVD Styler startup screen

A welcome wizard window pops up at the start, allowing you to create a new project or load a previously created one. To create a new project, type in the basic details and click OK. Basic details are:

  • disc label (this will be visible on the final DVD if you put it into a PC)
  • capacity (4.7gb for the most common single layer recordable DVDs)
  • video quality (I just left this on Auto)
  • Video format (PAL for UK, NTSC for US)
  • Aspect ratio (I chose standard 4:3 as my source videos are this ratio)
  • Audio format (I just left it has AC3 48Khz)

After clicking OK, a new window pops up asking for a default template to use. Enter a title and select “blue” as shown in the next picture.
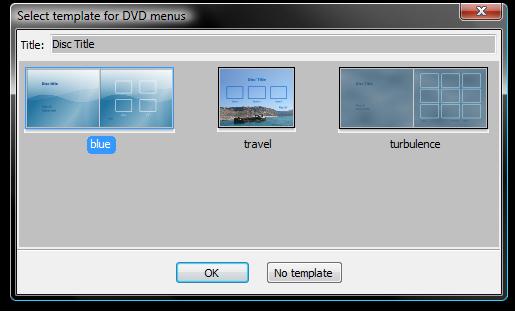
Template selection menu for DVD menus

Click OK to complete the wizard and progress to the main window.
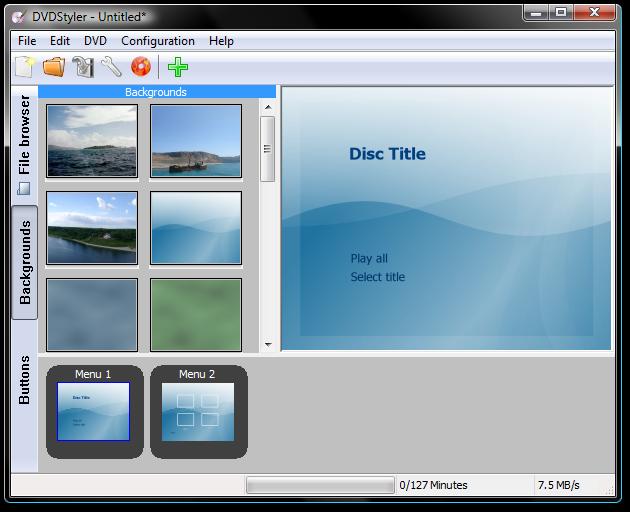
DVDStyler main window

This is the main screen. The bottom pane shows the menus and videos in this DVD session. The left pane shows default buttons and backgrounds that can be chosen. The right pane shows a larger version of the selected menu from the bottom.

Step 2: Add videos

Now its time to add the videos created in the previous step for this tutorial.
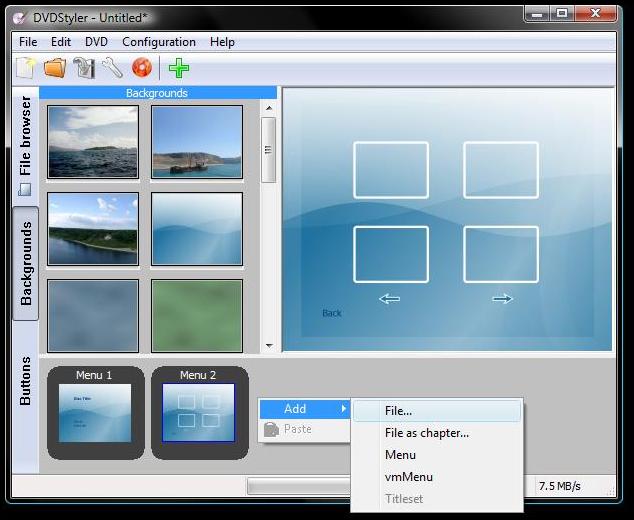
Picture showing right click on bottom pane to add in a video.

Right click in a space to the right of “menu 2”, click Add, then File… Next, find and select a video file you created earlier. You can only do this one at a time, so repeat this step for all the videos.

Loading a video takes some time. For me it took about 2 minutes to load in each video. This depends on the size of the file loaded and speed of the computer. Theres no indication of whats happenening so please just be patient.

For each video loaded, settings are required. Click the video button at the bottom to get a 2nd properties page, as shown in the next picture
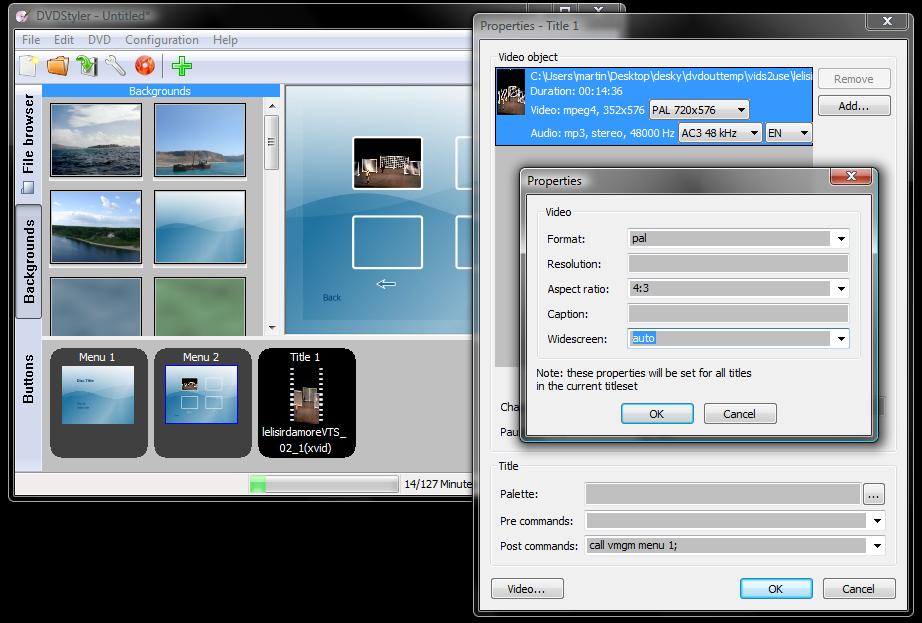
Properties windows for a new video

Make sure the Format and Aspect ratio match your initial settings. Nothing else needs changing. Click OK on both property windows and the video will appear at the bottom.

After loading all your videos, your screen should look like this:
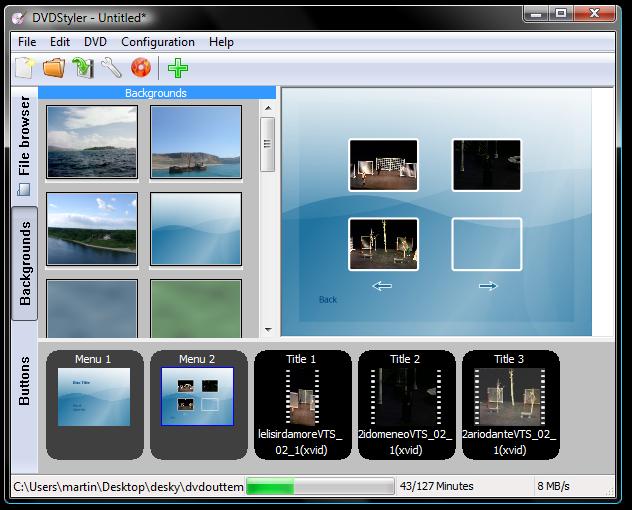
All 3 videos added and visible on the bottom pane, and in the menu 2 scene selector

Menu 2 (click on it on the bottom pane if its not shown on the right) shows small pictures of each video. This is the scene selection menu. Usually on a DVD, you can play the whole thing at once, or select chapters or scenes using a menu like this.

Save your project here so you can come back to it later. Remember the old Control S rule. Save frequently in case anything bad happens, so you don’t lose too much work.

Step 3: Customise menu settings and background

At this point you can change the background for menus. Each menu screen in the DVD has to be set individually so you have to do it for each menu. Starting with menu 1, right click on it on the bottom pane, then click Properties.
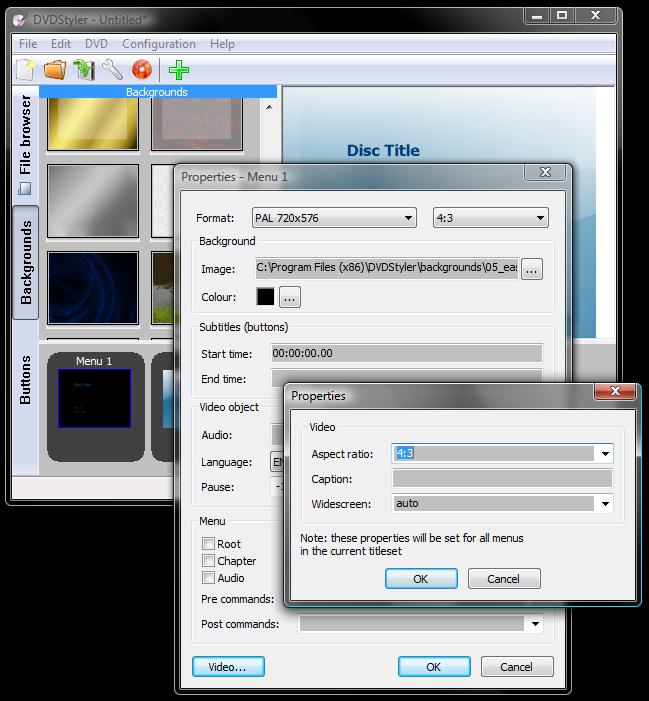
Properties windows for menus. Here you can change the background picture

Ensure the format is set correctly. In my case again, PAL with 4:3 aspect ratio. To change the background, Click the browser button (“…” button) next to Image near the top of the window. You can then choose a different image file for the background using the defaults in the folder, or select your own picture. I ended up choosing a turquoise background picture to replace the blue background.

Click on the Video button at the bottom to bring up the 2nd set of properties. Ensure the aspect ratio is set (in my case 4:3) and click OK to both properties windows.

Repeat this for menu 2.
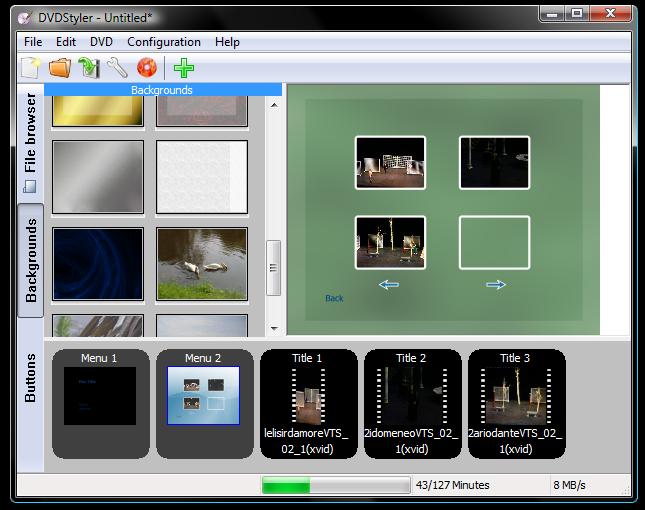
The right pane shows menu 2, with new turquoise background

As you can see, the menu 2 on the right pane shows the new background. For me, the icons on the bottom pane didn’t seem to update properly, but so long as the larger right pane is correct, that is fine. The icons at the bottom are just thumbnails which presumably didn’t update.

Step 4: Edit, Move and Delete Objects in the menu pages

The menu pages consist of a background and basic elements such as text, images and buttons. These can be manipulated easily by using the mouse and property options of each object. Lets take the menu 2 for example.
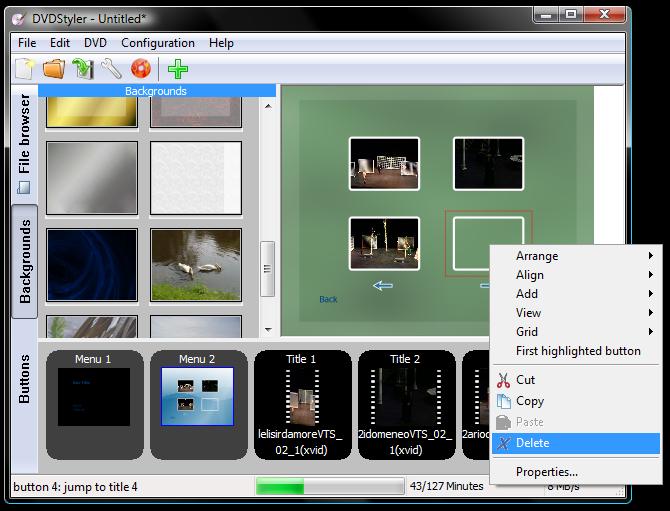
picture showing a selected object to be deleted.

In this menu, there is space for 4 video selections and arrows at the bottom to skip between different scene selection menus if you have more than 4 selections to make. In my case, I have only 3 videos so the arrows and one video slot is not necessary.

To delete an object in the menu, click on in with the left mouse button. You will see a red outline around the selection object. Then right click and select delete (as shown on the previous picture)

The remaining objects can then be dragged about the screen using the mouse to make it more presentable.
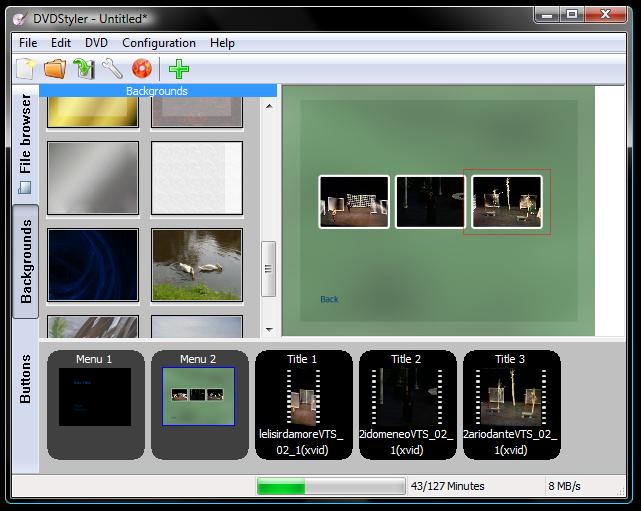
Only 3 scene selections now on the menu, and moved about to look better.

Because I only needed 3 scene options to choose, I rearranged them to look more appropriate.

Step 5: Change Text Object

In menu 1, I wanted to have Amanda’s name for the title. The template already created some text for the disc title, it says “Disc Title.” How original.
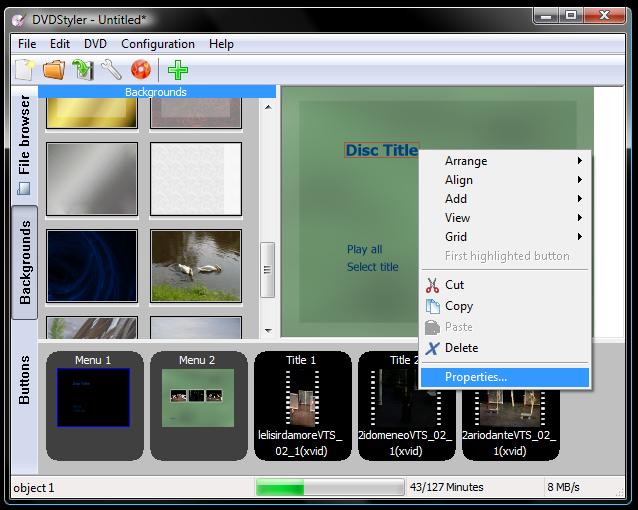
Getting options up for “Disc Title” text box so it can be changed

To change the text, select it, then right click and go to properties as shown in the previous picture.

This will bring up the next properties menu for the text object.
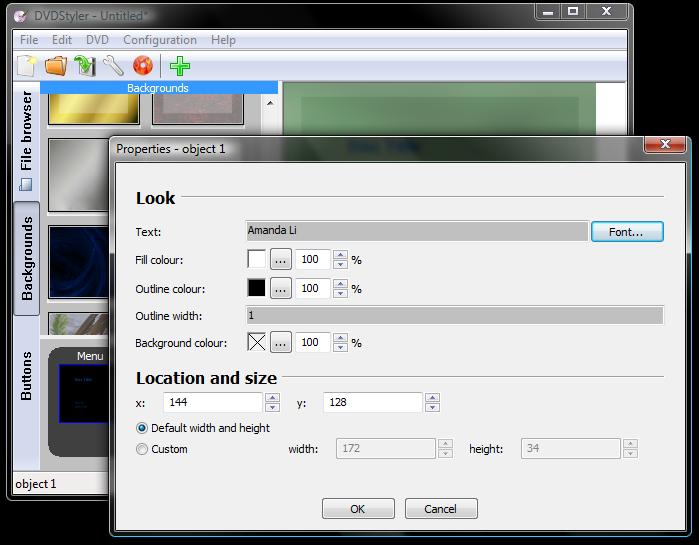
Properties for the text object.

In this properties box, you can change the text displayed, as well as the font, colour and size. I found this to be an iterative process, continually changing, clicking OK, seeing how it was on screen, then going back in to make small changes to get it just right.

Check the next post for the next part in this stage of the tutorial to use DVDStyler.

Share Button

Tags: , , , ,

6 Comments

Create a DVD Tutorial. Part 5

This post begins from from here: Create a DVD tutorial in case you are lost.

In this post series I talk about mastering a DVD from various DVD sources.

In this post I take you through using Virtual Dub, a free video editing package, to crop the video, add fade effects and save out your new video.

Step 4 Virtual Dub (Trim the videos and apply simple video editing)

Here’s where things get interesting. In this step you will get to edit your video using this powerful software. It is quite complex software and there is lots and lots of functions waiting for you. I’d highly advise spending some time playing with this package and explore the features. This guide gives some very basic loading and saving instructions, along with cropping and adding a blended fade to/from black effect. Hopefully this will get you started on your adventure of creating your perfect masterpiece!

Ill break this tutorial down to smaller steps as there is quite a lot to do

  1. Open the application (harder than it sounds)
  2. Open a video
  3. Set a Selection and Crop the video
  4. Add a fade to / from black effect
  5. Set video compression type
  6. Save the edited file

Step 1: Open the application.

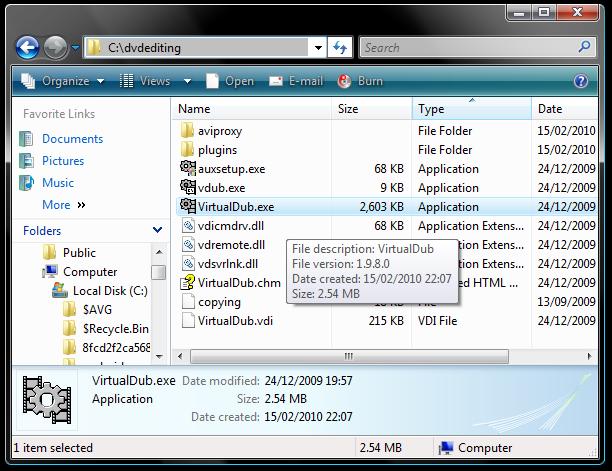
Firstly, Download and install VirtualDub from http://www.virtualdub.org/. I found that this package installed the files to the hard drive, but never installed a short cut to the start menu. If you can’t find VirtualDub in the start menu, you’ll have to find the VirtualDub.exe file in the installed folder. To do this, use windows explorer (Press Windows Key + E, or click on the “Computer” Icon on the start menu (“My Computer” for Windows XP). Navigate to the installation directory (Something Like C:\Program files (x86)\Virtual Dub. (Remove the x86 for 32 bit versions of windows) VirtualDub.exe should be in that folder. In my case, I installed the software to C:\DVDEDITING so I could find it easily from the C:\ root folder.

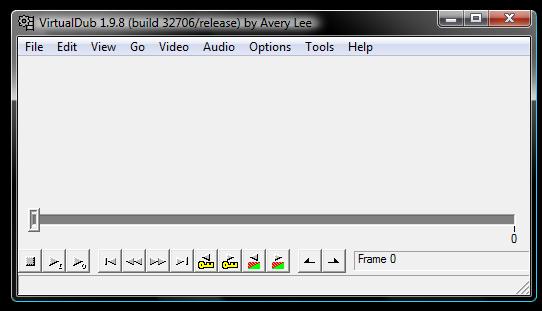
When you open the application, you will be presented with an empty window, with a horizontal scroll bar at the bottom with buttons. This is your default view with the play bar to show your progress through a playing video.

Step 1: locate the VirtualDub.exe application file in your computer if necessary

Step 1: VirtualDub applciation newly opened

Step 2: Open a Video.

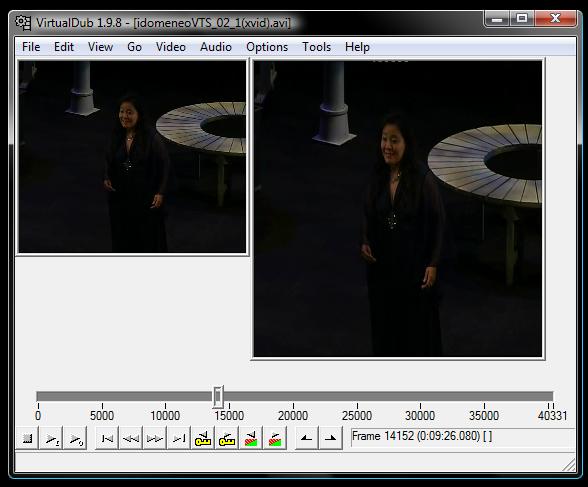
Step 2: An opened video showing 2 video screens and horizontal scroll bar at the bottom

Go to File then click Open Video. Then navigate to your AVI videos you created in the previous step You can have one video open at a time. So in my case, I had to do all my editing to one file before saving, and opening the next one.

When you open a video, you will see 2 video boxes appear. These are the pre-edit (left) and post-edit (right) boxes. They show the video before any editing has been done and what the final effect will be. For justnow they will be exactly the same as no editing has been done yet, but you will see the differences after doing the black fade effects later on.

These can be re-sized by clicking on the corner of each frame and dragging to any size or ratio. These boxes are for your own reference and the ratios and sizes on screen have no effect on the final file output.

Have a go at dragging the horizontal scroll bar to navigate through the length of the video. The numbers mark the frame numbers of the video, and you can play/stop using the buttons at the bottom (stop and play are at the bottom left)

Step 3: Set a selection and crop the video.

Amanda sang only for a section of the video so I had to crop out another singer in the video. To do this I marked the video by dropping start and end points, Then I cropped the selection to leave only what I selected.

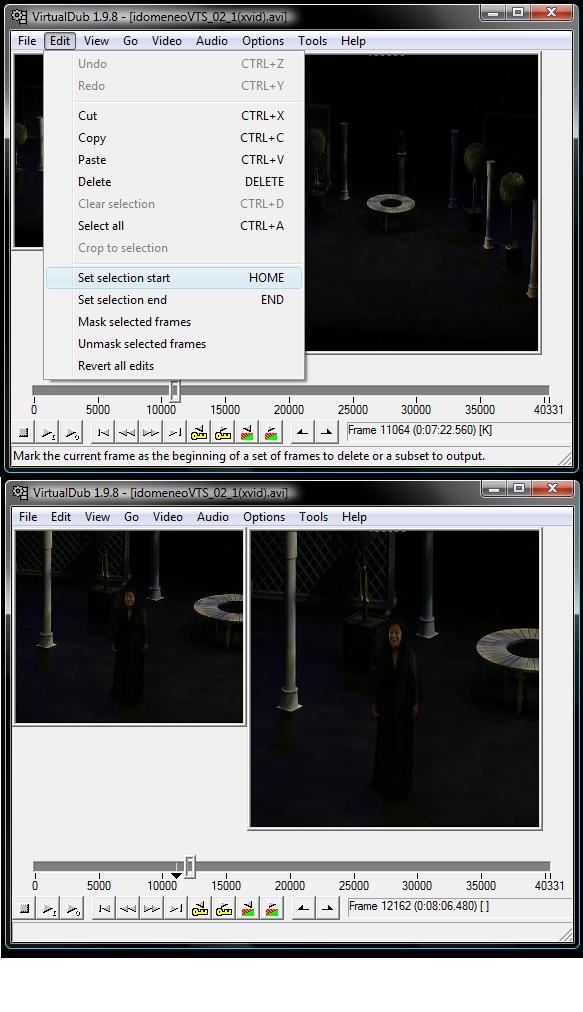
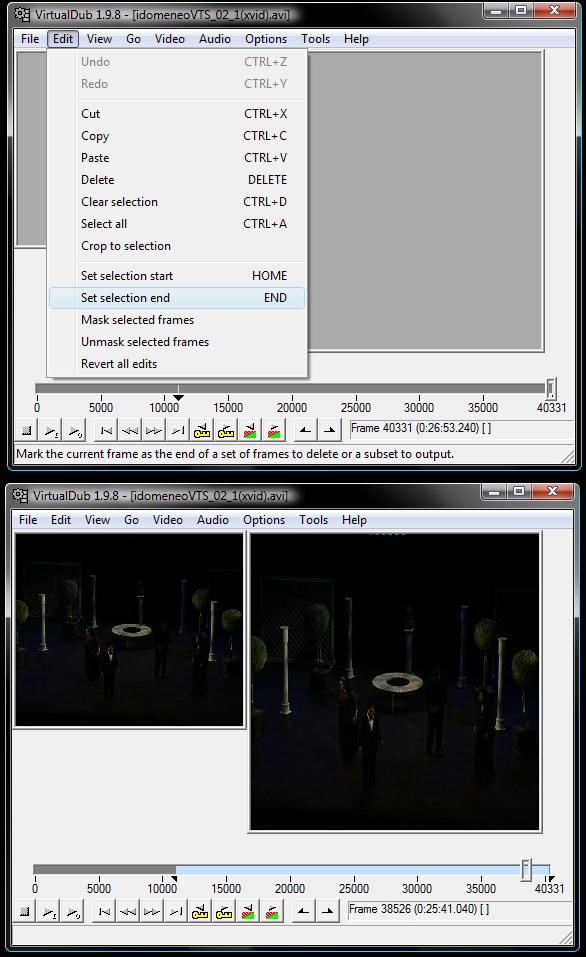
Step 3 – Making a selection: Set a start point

To drop the Start point, select where you want to begin the crop using the horizontal scroll bar. For extra precision, I used play and stop to get to the exact moment. Click Edit, Set selection start to drop the start point. Alternatively press the HOME button on the keyboard. Moving the Position on the video will reveal the dropped point (black triangle and thin line as shown in the screen shot above) Leave an extra second of video if you can. This will be useful to overlay the fade in effect in the next step.

Step 3 – Making a selection: Set an end point

To drop the End point, select where you want to end using the horizontal scroll bar. In my case, the end point was the end of the video. Click Edit, Set selection end to drop the end point. Or press the END button on the keyboard. As you can see in the screen shot, this will show a bright bar across the horizontal scroll bar. This is your selection.

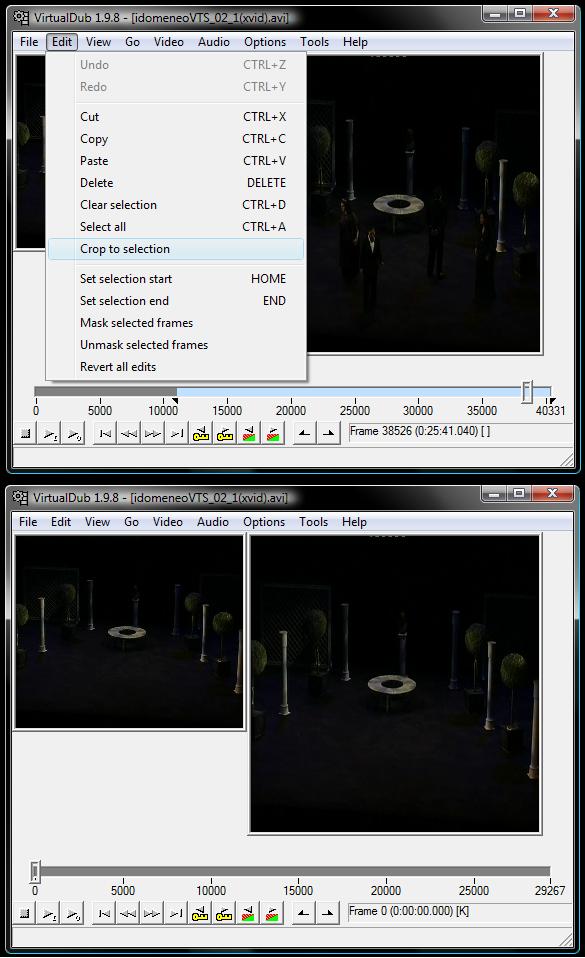
Step 3 – Crop the selection

Finally to Crop, click Edit, crop to selection. Notice the before and after in the screen shots. The Bright selection bar has dissappeared and the frame numbers across the horizontal scroll bar have decreased. This was our previous selection of video. The rest has been discarded, keeping the part you want.

Well done! Selecting parts of the video is an important step for copying, cutting, pasting and otherwise editing your videos. With these tools you can change the order of videos, trim(crop) and splice in different videos to make a combined video.

Step 4. Fade To / From Black.

After I cropped the video in the previous step, I saw that the video began abruptly with the scene and Amanda was about to sing. When playing this as a DVD track, this would look disjointed, especially if it was playing on from a previous track. What was needed was a Fade in to ease the transition. This means starting with a totally black picture, and blending in the video over a short time (1-2 seconds)

First, use the horizontal scroll bar at the bottom of the window to go to where you want the fade to happen. In my case, I wanted a fade in from the beginning so I went to the very start of the video. If I wanted it at the end, I’d scroll to about 2 seconds from the end of the video.

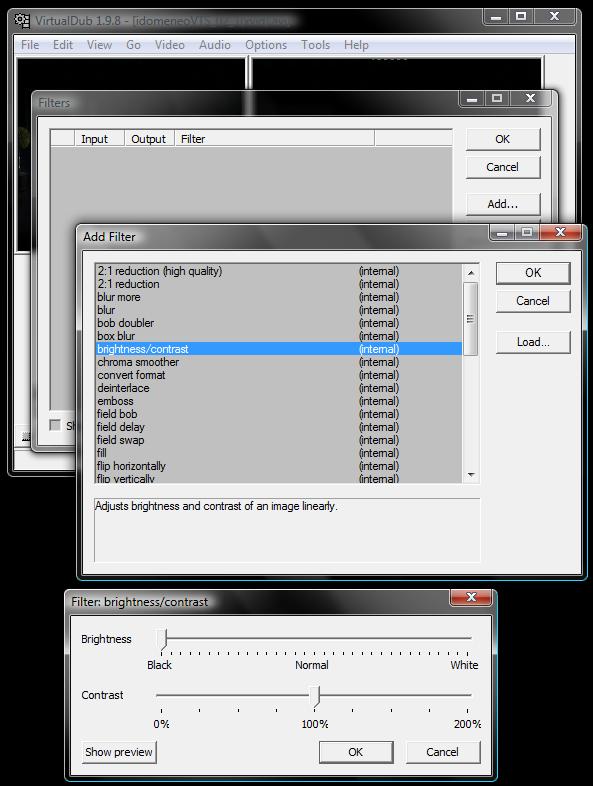
Step 4 – Fade to/from black: Add the brightness filter

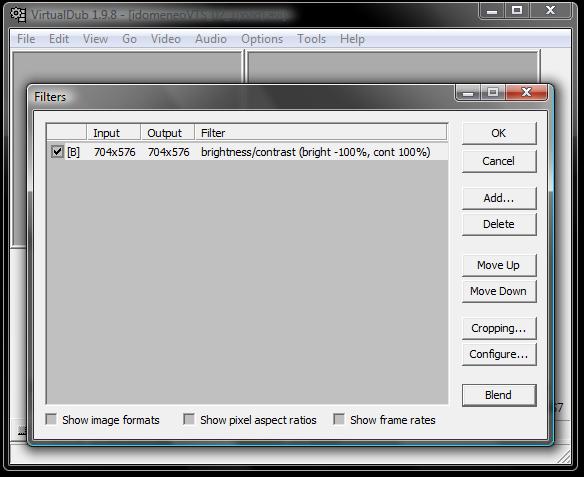
Step 4 – Fade to/from black: Set the [B] to blend

Next add a brightness/contrast filter to your video. To do this, bring up the video filters dialogue box by clicking on Video, Filters (or pressing CTRL+F). Click on the “Add…” button and select “brightness/contrast” in the next dialogue box. Click OK and you will then be asked about details for this filter. Select Brightness to full Black (move the top slider to the far left) and click OK. This means a filter will be applied throughout the whole video making it completely black. However only a small section of the video needs this, so a blend is needed. Click on the “Blend” button at the bottom right. The brightness/contrast Filter entry on the window should now have a [B] shown next to the tick box on the left. This shows that this filter will be Blended.

Step 4 – Fade to/from black: Showing the curve editor on screen

Now the filter is added, it needs to be blended correctly. Pull up the curve window by clicking View, Curve Editor. On the main window a new panel will be shown above the horizontal scroll bar at the bottom. Resize the two video windows if they cover it up.

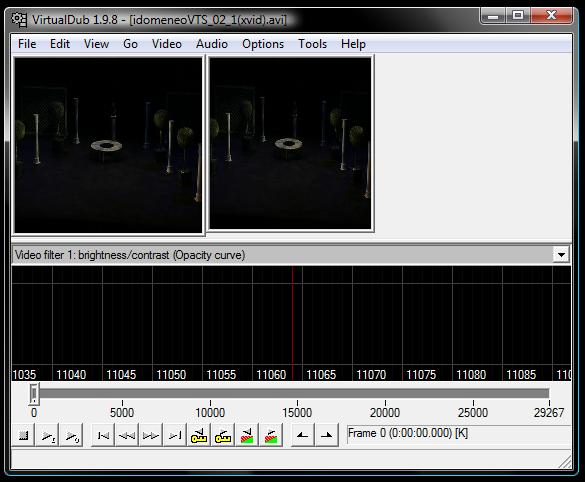
The red line in the centre represents the currently selected frame using the horizontal scroll bar. You may notice the frame numbers on the Curve Editor window aren’t the same as horizontal scroll bar. In my case (on the picture) I’m at frame 0, the very start of the video at the bottom, but on the curve editor I’m between frames 11060 and 11065. This is because this is the original frame numbers, before I started cropping earlier. This isn’t a problem, just be aware of it.

Step 4 – Fade to/from black: Points on the curve

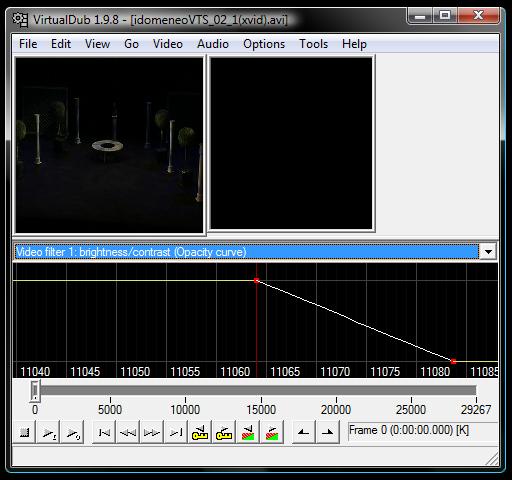
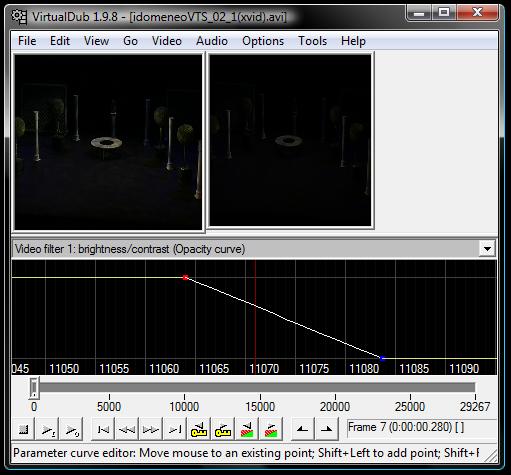
The next step is to add points into the curve. The curve represents the strength of the filter throughout time. I want a starting fade from black. This means I want to start at 100% strength (completely black) and then gradually lessen the strength so it ends at 0% strength (back to normal video) and keep it that way for the rest of the video. I need 2 points in the curve; a start point and end point. Move the mouse to the red vertical line, hold the left shift button (the mouse pointer icon should change to a mouse with a + icon next to it) then click the left mouse button. Next, move the mouse along about 20 frames worth to the right and drop another point. This will now show a horizontal line connecting both points and the sides of the screen. The line indicates the strength of the filter during the whole video, it just stays the same either side of the points.

The points can be moved about by hovering over them and dragging with the mouse. Make sure the Left point is as high as it will go at the start point of the video (where the red line is). Then ensure the right point is as low as possible 20 frames or so to the right. This provides the blend from black to normal video across those blends.

Step 4 – Fade to/from black: Looking at the output through time. The right video is darker

To see the result, move the horizontal scroll bar position through the start of the video and look at the video screens. The left video should always be the same, but the right one will be different brightness at different frames. You can also see it in action by pressing the play button. You can also use the mouse wheel to scroll, this gives much better precision between frames.

For a video that needs a fade to black at the end, just make sure the markers are at the right place (i.e. at the end) and begins at the bottom, then moves up to the top to make it black

Step 5. Set video compression type

Step 5 – Select the video compression…

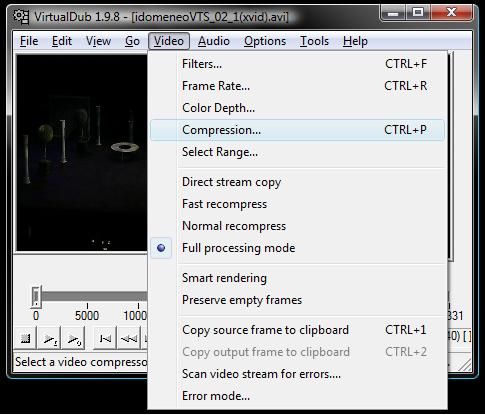
The next stage is to specify the output format. This is important because a compressed format is required to have reasonable file sizes. When I first saved, I used uncompressed avi. The output file size for a 15 minute video was over 20 Gigabytes, bigger than a DVD’s size. It might be possible to save a file that size, but I found problems loading it back in again with software later on, so I had to return to this stage to save it as a smaller file.

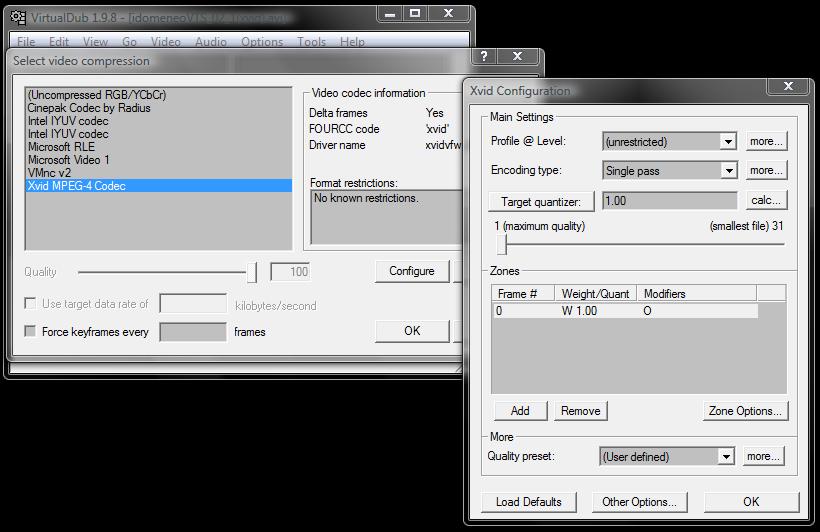
Bring up the Video Compression dialogue box by clicking on Video, Compression, or press CTRL + P. On the dialogue box, click on “Xvid MPEG-4 Codec” Next click on configure to bring up the controls for this particular selection. There are loads of controls, but for justnow just move the slider control to the far left for “1 (maximum quality)” Click OK on both windows to close.

Step 5 – Options for video compression

There are loads of settings for types of compression, and quality controls within each one. These result in different file sizes and different quality of video. Generally speaking, the lower the quality, the small the file size. For something like a youtube video, you might get away with a low quality because file size is important. For a DVD however, it would need quality. Take the time to find out what quality and settings are good for your purpose.

Step 6. Saving the file

With your new video edits and compression type entered, all thats needed now is to save your work. Click on File, Save as AVI… or press F7 to save your file in the usual way. Save this as a meaningful file name because this will be the file that will be used to build your DVD image. I called mine “Amanda track 1 FINAL.avi”

This is a complex piece of software and it takes a fair amount of work to get the effects you want but there are lots of cool effects to choose from and with enough practise you can master using the program to do exactly what you want. You’ve done well to get this far!

Share Button

Tags: , , ,

1 Comment